Wednesday, January 8, 2014

WIP Wednesday ~ 1-8-14


 Vintage Quilt Revival Block-Aong

My book arrived on Monday so I have started my quilt blocks. This is a wonderful book which goes along with my 100 Modern Quilt Blocks beautifully. For the block-along, we are to complete two blocks a week for a total of 20 blocks.  I just finished my first one...
Oh, Happy Day!


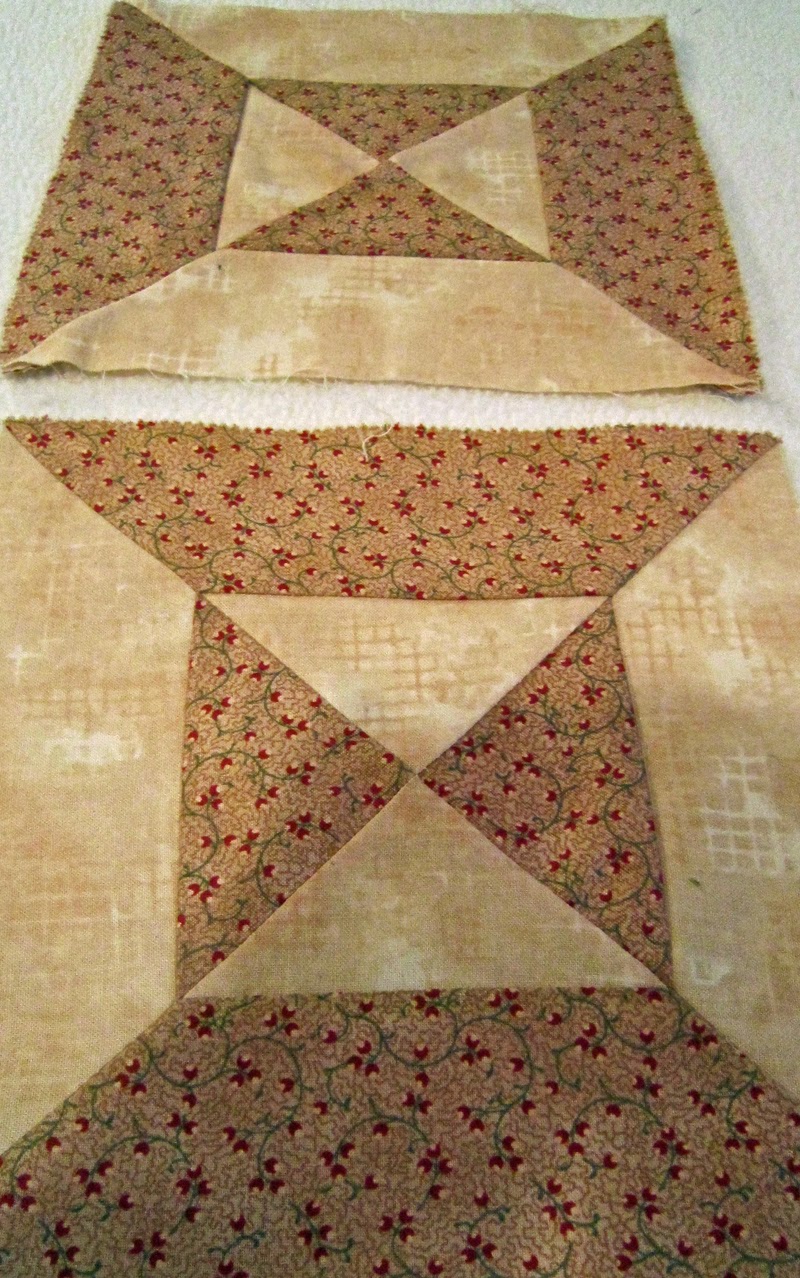
Classic Double Z Block ~ Block #1
Keeping these blocks in the right direction for sewing was a major problem for me. I would flip the one on the right over on top of the one on the left, but somehow I would flip it again so I sewed the wrong sides together. Finally, I figured out a plan. Flip the 2 squares on each other and then take my purple marking pen and draw 2 arrows in the CORRECT direction and write the number to the row on my ironed out seam. Voila...it worked. It took lots of ripping before I figured out a plan, but I did it. 

Here it is sewn together...

...and the front of my finished first square. One of my New Year’s resolutions is to force myself to use stash fabrics if at all possible, so that is what I did. The colors are more muted that they are showing up in this shot...way more vintage looking.


Now, I am ready to tackle block #2 which involves paper piecing...ugh....Classic Riviera Block

This post is linked with WIP Wednesday


Sunday, January 5, 2014

Slow Sunday Stitching

100 Modern Quilt Block Project ~ Chapter 1 ~ Crosses

This morning I completed piecing my first set of blocks, but I have not attempted squaring  them off as yet. It was quite the learning process. I fretted and stewed about choice of fabrics, sewed a lot, and ripped a lot, but I had an awful lot of fun along the way. Even though some of the blocks did not turn out the way I would have liked, I still left them so my boo-boos would be there to remind me not to make them again. Some of them are down right awful, but there are a few I will use for my quilt when I finish working through the book. Here are a few of the things I learned:


1. Be VERY careful about the fabrics I choose because they may well sew up differently than expected. By the end of the chapter, I was cutting out small pieces and lining them up exactly like one of the sections of the block to see if the blending was good or bad. 

2. Make sure I have fabrics with a pattern cut so that the pattern is going in the correct direction. Also, make sure all my fabrics are all cotton and not a blend.

3. Mark my 1/4 inch seams. Watch my stitches so I don't get off the magic purple line.

4. Study my light and dark contrasting fabrics carefully so that I get the effect the pattern is suggesting.

5. Do not use plaids unless I am willing to be happy with pieces that are not exactly straight.

5. Think of EVERYDAY as a SLOW SUNDAY and take my time. Slow down and smell the roses. Enjoy the flow of the needle and the feel of the fabrics.

Now, it’s time to start Chapter 2 which focuses on rectangles. This book has to be the best Christmas present ever. My daughter definitely knew what her mom would like.


Saturday, December 28, 2013

Slow Sunday Stitching

My daughter gave me the most wonderful quilting book for Christmas.
I would recommend it to anyone. I love it! 
Tula Pink’s City Sampler ~ 100 Modern Quilt Blocks.
(I have linked the title up with Amazon.)


The book is divided into six sections dealing with different types of blocks.
The first is crosses. The others are rectangles, triangles  stripes, squares, and Haiku. 
There are 14 different cross block patterns in the book.

On the left side page is a completed block.

On the right side page is the piecing order guide, recipes as to what size pieces to cut and how many, and room for notes.


 I am determined to make each of the 100 blocks over 2014.
 Here is what I have done so far...

 This is my interpretation of the book’s Block 5 shown above.
 It is hand pieced, and hand quilted for use as a coaster for my tea cup.

Back Side


The following three are my experimentation with the central cross pattern.


I was trying to see which I liked better...the dark background or the light ones.


This is another design with a floral cross and then the dark center cross.
I really like it.

I have had a wonderful 3 days playing with my fabrics, mixing and matching colors, and hand stitching. When the arthritis in my thumbs gets too bad, then I hit the sewing machine...but it is much more calming and soothing to hand quilt.

I also have followed the book’s suggestions and made myself a modified design wall. I took an old white board and affixed cotton batting to the cork side. The fabric blocks adhere to the batting wonderfully so I can see what I am doing. Easy Peasy! The problem is...where am I going to make one as the number of blocks increases?????? That’s gonna take some creative doing :-)


This post is linked with:

Sunday, December 22, 2013

More Christmas Presents


Little appliquéd felt and cloth ornaments...

Quilted Table Runner 
I made this for my daughter and gave it to her at Thanksgiving. She created the fun centerpiece out of colored paper, a marker, and a pineapple.

Quilted Table Runner in Blues


Christmas Tree Coasters
These are made following Tree Trivet Tutorial over at Stitching and Bacon.
It was the Christmas in July Challenge ~ July 10, 2013 post
I modified the pattern leaving out the hangers, but otherwise I tried to follow it as closely as possible. It is a wonderful tutorial.


Fronts of Quilted Christmas Tree Coasters
I have the pattern and the link to the tutorial if anyone would want it.


Backs of the Quilted Christmas Tree Coasters


Here are some extras that I am finishing up now. They need batting in the centers and a backing fabric.


Wooden Tag Banner 
The wooden tags came from an old timey Ben Franklin store in Fayetteville, WV.  The backs had seals on them saying where they were made and a bunch of other stuff so I got hot water and removed them. Then I took Christmas cupcake papers from the dollar bins at Michaels and glued them to the backs. I used green wired twine and then green wired ribbon to tie them together. I covered clothespins with Christmas paper and used them to hold the twine to the ribbon. The final thing was to take a glue gun to be sure the ties were secure on the backs and glued little holly thingies on the holes. 


Cork Garland ~ 1
Twine, bells, colored plastic beads and some wooden ones from Michaels, old corks, eye screws that go into each end of the corks, a glue gun to affix the beads and the bells so they don’t move, and ribbon for the ties on the ends. Easy Peasy!

Hope you can see the little eye screws.

Cork Garland~ 2
I made this one for my son, Gene. I used larger wooden balls/beads for it.

Tied Christmas Wreath
I used Williamsburg replica cotton prints. All the edges are pinked. The form is from a roll of some kind of Large bendable wire from Lowe’s.

A Silly Cork Christmas Tree

All of my presents are made and I stuck to my guns...I made them all. These are just some of my favorites I shared with you all.


This post is linked with:

Slow Sunday Stitching


Sew Darn Crafty 


MERRY CHRISTMAS

Saturday, November 23, 2013

It’s Present Making Time

 I am working hard making my Christmas Presents


Quilted Christmas Table Runner
The underside is a pattern which can be used all year round.
The lighting in my dining room is nada so will try again to get a better shot.


Inexpensive student composition book covered with fabric for use as  journal.


 Christmas table runner under construction.
The backing of this one is a batik.

 Four quilted hot plates under construction.

Two mores pieced squares to make into quilted hot plates.


Quilted Christmas tree wall hanging under construction.


A fall wreath with pinked ties knotted around a coil of medium wire covered with formal tape.